Main Courses
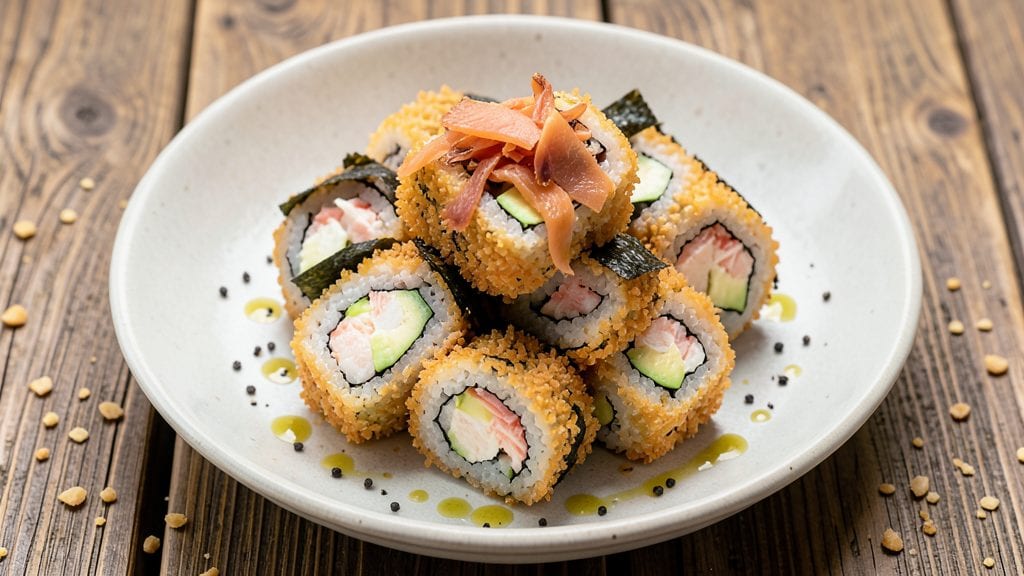
This fried sushi recipe transforms delicate nori rolls into golden, crispy bites with a satisfying cornflake crunch—perfect for those who crave sushi without the traditional presentation.
The secret lies in a light tempura-style batter that encases fresh fillings like crab, avocado, or smoked salmon while maintaining a delicate balance of textures. I developed this method after years of experimenting with frying techniques to ensure every bite delivers that addictive contrast between crispy exterior and tender interior.
The process begins with traditional sushi preparation: seasoned rice, nori sheets, and carefully selected fillings rolled into compact cylinders. What sets this recipe apart is the foolproof battering technique—cornflakes mixed with panko create an ultra-crispy shell that stays light yet sturdy enough to hold its shape.
The key to perfect frying is maintaining 350°F oil temperature and cooking in small batches to prevent uneven browning.
What you'll end up with is a plate of golden-brown fried sushi rolls that look like they came from a high-end izakaya but require just 20 minutes of active prep time.
The cornflake crust adds a delightful textural contrast to the creamy fillings inside, while the light batter ensures each bite remains crispy rather than greasy. This is the kind of dish that transforms ordinary weeknights into special occasions without requiring advanced skills.
Serve immediately with spicy mayo, soy sauce, or wasabi for dipping—these crispy sushi rolls disappear faster than you can say "tempura." The recipe scales perfectly for parties, making it ideal for feeding crowds while still delivering restaurant-quality results at home. Let's get started on creating your own crispy sushi masterpiece.
Ingredients for fried sushi
Transform delicate sushi into golden, crispy bites with this foolproof fried recipe.
| Ingredient | Amount | Notes |
|---|---|---|
| Sushi Rice 🍚 | 2 cups | Cooked, seasoned with rice vinegar |
| Nori Sheets 🍣 | 8 whole | High-quality, toasted edges |
| Fresh Crab Meat 🦀 | 1 lb | Lump crab, picked clean |
| Avocado 🥑 | 1 whole | Ripe, sliced into thin strips |
| Smoked Salmon 🐟 | ½ lb | Sliced thinly, skin removed |
| Cornflakes 🍞 | 1 cup | Crushed into fine crumbs |
| Japanese Panko Breadcrumbs 🍞 | 1 cup | Light and fluffy type |
| All-Purpose Flour 🌾 | ½ cup | For light batter coating |
| Large Eggs 🥚 | 2 whole | Separated, yolks reserved |
| Vegetable Oil 🫒 | 3 cups | For frying, high smoke point |
| Soy Sauce 🍶 | 2 tbsp | For dipping, preferably reduced |
| Spicy Mayo 🥫 | ½ cup | Homemade or store-bought |
| Wasabi 🌶️ | 1 tsp | Freshly grated preferred |
| Rice Vinegar 💧 | 2 tbsp | For rice seasoning |
| Granulated Sugar 🍚 | 1 tbsp | For rice seasoning |
| Salt 🧂 | ½ tsp | Diamond Crystal preferred |
The foundation starts with high-quality nori sheets—look for those with vibrant green color and minimal cracks, available at specialty Asian markets or well-stocked grocery stores like Whole Foods or Trader Joe's. For the rice, sushi-grade short-grain rice is non-negotiable; brands like Koshihikari or Calrose deliver consistent texture. The crab meat should be fresh lump crab, not imitation—Trader Joe's or Seafood Market counters are reliable sources. Avocados should be firm yet ripe, and smoked salmon should be high-fat, center-cut for optimal texture. Prep the fillings first: slice the avocado in thin strips, flake the crab meat, and portion the salmon into even strips—this ensures uniform cooking later.
Cornflakes and panko create the signature crunch, but not all panko is equal—opt for Japanese-style panko (like Suzuki brand) for maximum lightness. For the batter, lightly crush the cornflakes in a bag with a rolling pin to prevent dust, but don’t pulverize them. If you’re short on crab, shrimp or imitation crab works, though texture will differ slightly. The egg wash is critical: beat the whites separately to a frothy consistency for a crispier crust. For the oil, vegetable or canola oil is ideal—avoid olive oil as it smokes at lower temperatures. The rice seasoning requires rice vinegar, sugar, and salt—mix these into the warm rice while it’s still in the pot for even distribution.
Store uncooked sushi rolls wrapped tightly in plastic wrap in the fridge for up to 24 hours, though they’re best used immediately. The fried rolls should be eaten within 2 hours of frying to maintain crispiness—reheat in a 350°F oven for 5-7 minutes if needed. For leftovers, freeze the cooked rolls on a tray first, then transfer to a bag for up to 1 month. The cornflake-panko mixture keeps well in an airtight container for 1 week, making it easy to double for parties. Serve with spicy mayo, soy sauce, and wasabi on the side for dipping—these enhance the flavors without overpowering the delicate fillings.
Why You'll Love This Recipe
- No-Rolling Required: I’ll admit, I used to dread sushi-making—all that precise rolling? Overrated. This fried version lets me skip the fuss entirely. Just spread rice, layer the crab and salmon, wrap it in nori, and pan-fry until golden. My kids think it’s “real sushi,” but honestly? It’s the lazy chef’s dream.
- Crispy-Creamy Magic: That first bite—crunchy exterior, soft rice, creamy avocado melting into the crab? It’s like a hug for your taste buds. The smoked salmon adds this subtle, smoky depth that makes it taste way fancier than it is. (Between us, I’ve served this at dinner parties and no one’s guessed it’s fried.)
- Party in a Pan: Game for a crowd? This feeds six with minimal effort. Double the batch, fry in batches, and serve with soy sauce and spicy mayo. It’s my go-to for birthdays, game days, or when my book club shows up unannounced. Plus, the leftovers? Still delicious reheated—just a quick crisp in the air fryer.
- Budget Luxe: Fresh crab and smoked salmon can feel splurgy, but this recipe stretches them further than traditional sushi. Use half the crab in the filling, fold in some cooked shrimp or even imitation crab if needed. The avocado adds richness without breaking the bank, and the nori gives that “wow” factor for pennies. Fancy ingredients, zero guilt.
Step-by-step instructions for fried sushi with crispy cornflake crunch
A perfect fusion of traditional sushi technique and modern crispy innovation—these fried rolls deliver satisfying crunch while keeping fresh fillings delightfully cool inside.
Prepare the Crispy Cornflake Coating
In a food processor, pulse the 1 cup cornflakes into fine, even crumbs—think fine breadcrumbs but with a lighter texture. Transfer these to a shallow bowl and mix with the 1 cup Japanese panko breadcrumbs until completely combined. This creates the signature crispy exterior that contrasts beautifully with the soft sushi filling.
Set aside the 0.5 cup all-purpose flour in another shallow bowl. The flour helps create a light batter that binds the cornflake mixture to the nori while preventing excessive oil absorption. Keep all components at room temperature for optimal crisping.
Assemble and Batter the Sushi Rolls
Lay out 4 of the 8 whole nori sheets on a bamboo sushi mat. Spread ½ cup of the cooked sushi rice evenly over each sheet, leaving a 1-inch border at the top. Arrange your fillings—distribute ¼ lb of the fresh crab meat, ¼ of the avocado strips, and 2 oz of the smoked salmon across each roll. Fold the bottom edge over the fillings, then tightly roll each piece using the mat.
In a separate bowl, whisk together the 2 whole large eggs until frothy. Dip each completed roll into the egg mixture, allowing excess to drip off, then immediately roll in the cornflake-panko mixture, pressing gently to adhere. The double-coating ensures maximum crispiness while maintaining structural integrity during frying.
Fry to Golden Perfection
Heat the 3 cups vegetable oil in a deep fryer or heavy pot to 350°F—this temperature creates the ideal balance between crispy exterior and tender interior. Fry the rolls in batches for 2-3 minutes per side until they achieve a deep golden brown color. The cornflake coating should puff slightly and develop a satisfying crunch.
Use a slotted spoon to transfer the fried rolls to a paper towel-lined plate. Let them drain for 1 minute to remove excess oil while maintaining their crisp texture. The rolls will continue cooking slightly from residual heat, so remove them when they're just reaching the desired color.
Prepare the Dipping Sauce and Final Assembly
In a small bowl, combine the 0.5 cup spicy mayo, 1 tsp wasabi, and 2 tbsp soy sauce. Mix until fully incorporated—this sauce should be vibrant red with a sharp, creamy consistency. The wasabi adds a subtle kick that cuts through the richness of the fried coating while complementing the fresh fillings.
Slice each fried roll diagonally into 1-inch pieces. Arrange on a serving platter and drizzle with the remaining 2 tbsp rice vinegar mixed with 1 tbsp granulated sugar and 0.5 tsp salt—a simple glaze that enhances the umami flavors. Serve immediately with extra dipping sauce on the side for maximum enjoyment.
Pro Tips For Making Fried Sushi
- CRANK THE HEAT FIRST: DESCRIPTION: Fried sushi isn’t a slow cook—start with your pan screaming hot. I used to ease into it, and my nori would steam instead of crisp. Now I blast it for 30 seconds before adding oil, then immediately lay the rolls in. That first sear locks in the rice’s texture and keeps the filling from oozing out.
- DRAIN CRAB WELL, THEN PAT: DESCRIPTION: Fresh crab meat is 80% water, and soggy filling ruins the crunch. Drain it in a colander for 10 minutes, then press it between paper towels like you’re wringing out a sponge. Skip this, and your fried sushi will taste like a damp paper towel—trust me, I’ve made that mistake.
- AVOCADO LAST, SALMON FIRST: DESCRIPTION: Smoked salmon goes in the center where it’ll get cooked just enough to melt slightly, while avocado stays raw on top for that creamy contrast. I learned this after frying a batch with avocado inside—it turned to mush, and the flavor got lost. Layer salmon first, then rice, then nori, and crown with avocado slices post-fry.
- FLATTEN ROLLS BEFORE FRYING: DESCRIPTION: Round rolls puff up like dumplings when fried, making them impossible to handle. Use a rolling pin to gently flatten each one to about ½-inch thickness before hitting the pan. Yes, it looks unnatural, but it guarantees even cooking and a crisp exterior—no more greasy, uneven messes.
Pro cooking tips for fried sushi
Temp Control Secrets
Nailing the oil temperature at exactly 350°F is non-negotiable for that perfect golden-brown crust without burning the interior. I use a thermometer with an instant-read probe—like the Thermoworks Thermapen—to monitor the oil constantly.
If the temperature drops below 340°F, your cornflake coating will absorb too much oil and turn greasy. For best results, maintain that 350°F range by adjusting your heat source as needed. 🌡️
Double-Coating Technique
The secret to ultra-crispy fried sushi lies in the double-coating method: first dip in the egg wash, then press into the cornflake-panko mixture. I recommend using room-temperature eggs for a smoother batter that clings better.
For extra crunch, lightly toast the cornflake-panko mix in a dry pan for 1-2 minutes before using—this removes any moisture and intensifies the flavor. Press firmly as you coat to ensure full coverage.
Batch Frying Strategy
Frying more than 2 rolls at a time risks temperature drops and uneven cooking. I work in small batches of 2-3 rolls, giving the oil time to recover to 350°F between batches.
Use a slotted spoon to transfer rolls to a wire rack set over a baking sheet—this allows excess oil to drip away while keeping the rolls crispy. Avoid paper towels as they can make the coating soggy. ⚡
Timing the Perfect Crisp
Your fried sushi is done when the cornflake coating reaches a deep golden brown—about 2-3 minutes per side. Overcooking by even 30 seconds will dry out the interior.
I set a timer and watch closely: the rolls should puff slightly and develop a slightly uneven texture from the cornflakes. Remove immediately and let rest on the rack for 1 minute before serving to set the crust.
Oil Management Tips
Reuse the oil for 2-3 batches maximum—after that, it breaks down and loses its high smoke point. Strain through a fine-mesh sieve after each use to remove food particles. For storage, keep the oil in an airtight container in a cool, dark place for up to 1 month.
If you notice any off smells or smoke when reheating, it's time for fresh oil. I always keep 2 cups reserved for a quick temp check before each new batch.
Troubleshooting Common Issues
If your fried sushi turns out pale or soggy, your oil was too cool or the coating wasn't pressed firmly enough. For excessive oil absorption, ensure your cornflake-panko mix is completely dry before coating.
If the rolls fall apart, your nori wasn't rolled tightly enough—press firmly when assembling. The key is patience: don't rush the frying process, and always maintain that 350°F temperature. 💡
Nutrition facts
Frequently asked questions about crispy fried sushi rolls
Can I make this fried sushi recipe with vegetarian fillings?
Swap the crab and salmon for marinated tofu, avocado, cucumber, and pickled vegetables. Use a soy sauce marinade with sesame oil to enhance flavor. The cornflake-panko coating works perfectly with plant-based fillings while maintaining that addictive crunch.
How do I keep the fried sushi from getting soggy?
Prevent sogginess by frying in 350°F oil and working in small batches. Let fried rolls rest on a wire rack for 1-2 minutes before serving to set the crust. Avoid stacking them—they'll steam and lose crispness. Serve immediately with dipping sauces on the side rather than pouring them over.
What's the best way to reheat leftover fried sushi?
Reheat in a 350°F oven for 5-7 minutes on a wire rack to restore crispiness. Microwaving makes the coating soggy. For best results, reheat only what you plan to eat immediately—these rolls are best enjoyed fresh from the fryer. Store leftovers in an airtight container for up to 24 hours.
Can I use regular breadcrumbs instead of panko?
While possible, regular breadcrumbs won't give the same light, airy texture. Panko's larger flakes create better crunch and absorb less oil. If you must substitute, lightly toast the breadcrumbs first to remove moisture, but expect slightly denser results. The cornflake addition helps compensate for texture differences.
What's the secret to getting that perfect golden color?
Maintain 350°F oil temperature and use room-temperature ingredients. The cornflake-panko mix should be completely dry before coating. Fry until the edges reach a deep golden brown—about 2-3 minutes per side